
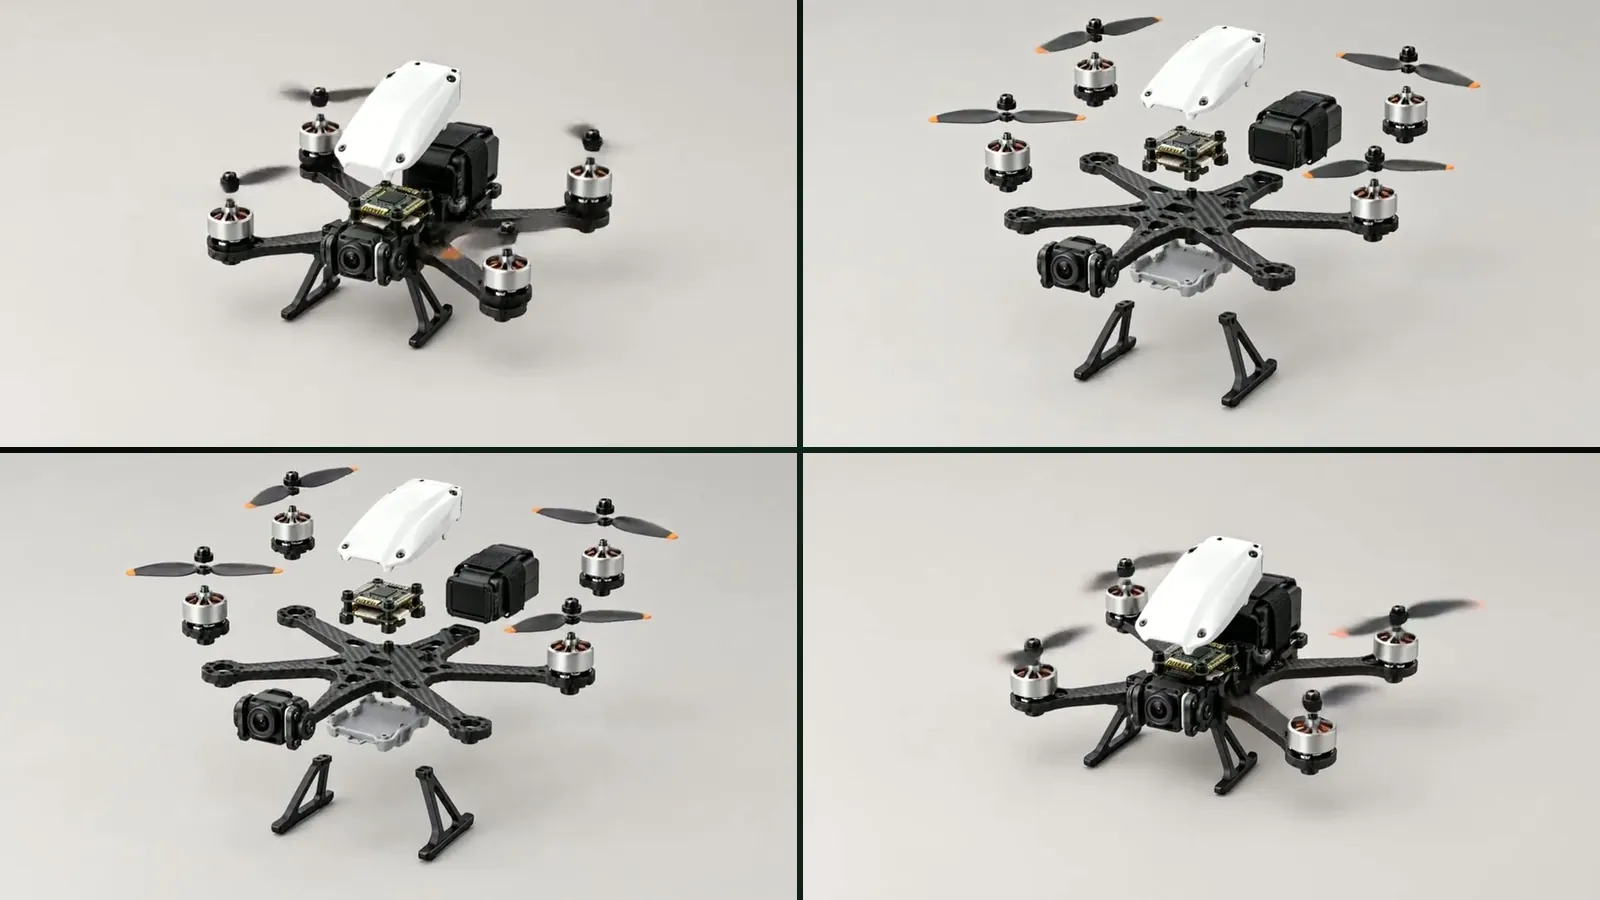
An exploded view product animation is a short video in which a product's parts separate along a shared axis, or come together from scattered parts into the finished whole. It is often called an assembly or disassembly animation, and its job is to show at a glance what is inside a product, what it is made of and how the parts fit together.
This article covers where the idea comes from in technical drawing, the components of a good assembly animation, how to plan one step by step, the most common mistakes, and how to make the same thing in Yeşilçam Studios from a single product photo.
What is an exploded view and where does it come from?
The exploded view is an old convention of technical drawing. The parts of a mechanism are drawn slightly pulled away from their real positions, each one faithful to its assembly order and axis, so the reader understands which part sits where. Early examples appear in the notebooks of Renaissance engineers, including among Leonardo da Vinci's drawings of machines.
In the industrial age the exploded view became the shared language of service manuals, spare-parts catalogues, patent drawings and flat-pack furniture instructions. Once computer-aided design software could separate parts automatically, the same image started to move: first in engineering presentations, then in product launch films, crowdfunding campaigns and online shop pages. Today's videos of headphones, watches, drones or coffee machines floating apart in mid-air are the moving continuation of that tradition.
Why does an assembly animation work?
A product photo shows the surface; an assembly animation shows the structure. In a few seconds the viewer sees the quality of the materials, the number of parts and the engineering effort. That makes it a strong format for technical products, modular designs and any category where "what is inside" influences the buying decision.
- It explains a complex product without needing text.
- It raises the perception of quality and craft; hidden parts finally get screen time.
- It can loop: a take-apart-and-rebuild flow runs seamlessly on social media.
- It is the most natural material for scroll-driven product pages, where the product opens up as visitors scroll.
Where are exploded views used?
Today the moving exploded view appears not only in launch films but at many points in a product's life. The same image does a different job in each channel:
- Online shop product pages: as the first frame of the photo gallery or as a section that opens as you scroll.
- Social media ads: short loops that grab attention in the first two seconds and still make sense with the sound off.
- Trade fair and in-store screens: continuously looping promo videos that need no text.
- Sales presentations and investor meetings: to convey the engineering effort behind a product in seconds.
- Usage and maintenance content: to show a part replacement or an installation step by step.
Each channel has its own length and aspect ratio. A vertical social feed usually works best in 9:16, a web page in 16:9 and a product card in 1:1, which is why preparing several versions of the same product is common practice.
What are the components of a good exploded view animation?
Flow
The direction of the animation: from whole to parts (disassembly), from parts to whole (assembly), or a combination. The assembly direction usually ends on a climax, the finished product; disassembly starts with curiosity and ends on the inner structure.
Axis and order
Parts are not flung around at random; they separate in an order that matches the real assembly, usually along the product's main axis. The outer cover moves first, the inner components after it. When the order breaks, the viewer can no longer read the product.
Spacing and timing
The gap between parts should be wide enough for each part to be recognised and narrow enough for the product to still feel like one object. Motion should ease in and ease out; a short pause when the parts are fully separated gives the viewer time to study the structure.
Camera
A locked camera shows the structure most clearly. An orbit around the product adds depth and volume and reveals details hidden behind other parts. The orbit should be slow and go in one direction.
Background and light
A clean dark or neutral background makes the parts stand out. Soft studio light keeps differences between materials (metal, plastic, fabric) readable.
How do you plan an exploded view animation?
- List the product's main parts: outer shell, covers, main modules, visible screws or connectors. Between five and twelve main parts gives a readable result for most products.
- Decide the assembly order and choose the axis of separation. A vertical axis works well for cylindrical products, layer-by-layer separation for flat ones.
- Choose the flow: parts to whole for a launch film, whole to parts for a technical explanation, a combination for a loop.
- Choose the camera: locked to show structure, a half or full orbit to show volume.
- Set the length. Five to ten seconds suits social media; 20 seconds or more suits a product page or a presentation.
- Think about the final frame: leave a moment at the end of the video to breathe, for a logo, a product name or a single message.
What should the product photo for an assembly animation look like?
In assembly videos made with generative methods, the source photo is half the result. The model has to guess any detail it cannot see in the photo, and the more it guesses, the less the product looks like itself. A good source photo has these qualities:
- The whole product is in frame and not cut off at the edges.
- There is a single product in the frame; no hands, second objects or busy scenes.
- The light is soft and even; hard shadows and glare do not hide detail.
- Logos, lettering and buttons are clearly legible.
- The resolution is sufficient; the short side is at least a few hundred pixels.
How does the traditional 3D method compare with the generative one?
| Criterion | Animation from a 3D model | Generative animation from a photo |
|---|---|---|
| Input | A part-by-part 3D model of the product | A single product photo or a text description |
| Accuracy | Real parts, engineering accuracy | Visually convincing, but the parts are generated |
| Time | Days or weeks | Minutes |
| Best suited to | Technical documentation, assembly instructions | Promotion, social media, product pages |
The two methods are not rivals. In assembly instructions every screw must be in the right place; in a social media ad it is enough for the feeling and the perception of quality to be right. If you have no 3D model, or want to try a few ideas quickly, the generative method is a good place to start.
What are the most common mistakes?
- Too many parts: showing every screw separately turns the image into a cloud of fragments.
- Impossible motion: parts passing through each other or separating in the wrong order make the structure unreadable.
- A fast camera: when both the parts and the camera move quickly, the viewer cannot follow anything.
- A poor source: if the product photo is dark, cluttered or cropped, the result will be too.
- No pause at the end: if the finished product never holds still, the viewer never sees the payoff.
Assembly videos made with generative AI have two further problems: the model inventing parts that do not exist, and details such as the product's logo, lettering or colours drifting between frames. The way to reduce this is to fix the start and end frames first and generate the motion between them. We explain why image-to-video is more reliable than text-to-video here in our text-to-video and image-to-video comparison.
How do you make an assembly / disassembly video in Yeşilçam Studios?
The Assemble / Disassemble template in Film Studio does this from a single product photo or a short text description. As of October 2026 the template offers these options:
| Option | Values |
|---|---|
| Flow | Whole to parts, Parts to whole, Take apart and rebuild, Build and take apart |
| Camera | Locked, 180° orbit, 360° orbit |
| Quality | Standard (720p), Pro (1080p), 4K (subscribers only) |
| Length | 5, 10, 20, 30, 40 or 60 seconds (depending on flow and camera) |
With an orbit each section lasts 10 seconds, and a 360° orbit needs at least 20 seconds of generation. In round-trip flows such as Take apart and rebuild, the reverse direction needs no extra generation and is not charged; a 20-second take-apart-and-rebuild video, for example, generates 10 seconds. Planning, keyframes, video and editing run in sequence; you can leave the page in the meantime, and the video is also saved to your library.
If you want to keep your own photo, the "Use my photo as it is" option makes your photo a frame of the video: depending on the flow it becomes the first, the last, both the first and last, or the exact middle frame, and the other frames are generated to match its light and setting. The photo's short side must be at least 700 pixels for this option. If your photo is blurry or dark, "Enhance the image with Sam" produces a new ad-quality image while keeping your product intact. For details see the Assemble / Disassemble guide and the product photo guide.
The price is shown in tokens before production: at the Basic list price, per second it is 24,501 tokens for Standard ($0.15), 32,667 for Pro ($0.20) and 122,501 for 4K ($0.74), plus the keyframes (29,167 tokens, $0.18) and planning. The Free plan applies a ×1.3 multiplier and the Pro plan ×0.8; failed jobs are refunded automatically. For videos up to 8 seconds, if you are not happy with the result you can regenerate once for free with the same keyframes. Current prices are on the pricing page.
A finished video can also become a product page that plays as visitors scroll, via the "Create a website from this video" button; we cover that technique separately in the scroll-driven product page article.
Frequently asked
Is an exploded view the same as an assembly animation? Largely, yes. An exploded view is the drawing or image of the parts pulled apart; an assembly animation is the moving version of that separation and reunion. The reverse direction is often called a disassembly or teardown animation.
Do I need a 3D model for an assembly video? In the traditional workflow, yes: the parts are separated from a 3D model. The Assemble / Disassemble template in Yeşilçam Studios works from a product photo or a text description instead; the parts are generated visually and are not engineering-accurate.
Which products suit an assembly animation? Products with several visible parts: electronics, watches, headphones, small appliances, furniture, toys and cosmetics packaging. With single-piece products the effect stays weak.
How long should the video be? Five to ten seconds is usually enough for social media. On a product page or in a presentation, 20 seconds or more, combined with an orbit, shows more detail.
Why is the take-apart-and-rebuild flow cheaper? Because only one direction is generated; the return is edited from the same footage in reverse and is not charged.